Saturday, July 31, 2010

heart the art: week 31--crazy!

hello fellow HEART-the-ART-ophiles! for a change of pace this week gina asked if i would guest host, and of course i was pleased and proud to do so!

this week's topic was inspired--somewhat tangentially--by the fact that, for the first time in almost 25 years of marriage, i am the one doing almost all of the driving in our household. a fact that is taking both lovely husband jeff myself a bit of time to get used to. pursuant to this, it has been pointed out to me...more than once, actually...that whereas in all other realms of existence i am kindly and mild-mannered almost to a fault, when i am behind the wheel of a car, and someone MESSES WITH ME, i undergo an incredible-hulk-like transformation in which my demeanor--and language--could make a longshoreman blush. go figure. :)

thus, this week's topic is... *CRAZY*!


is there something in your life that just totally sets you off in an uncharacteristic rage? do you have a hidden OCD habit, or an irrational fear of feather dusters?? are you in the grips of a secret polka-dancing addiction? or perhaps you're just nuts about david cassidy or belgian waffles??

go any way you want with this: serious or funny...digi or paper...journal page or blog post... and if you'd like to share we'd love to see it, so g'head and post it to the flickr group, or leave me a link!

thank you for visiting and i hope you'll join in with our HEART the ART hijinks!

Friday, July 30, 2010

travel book winner!!!

please help me offer hearty
CONGRATULATIONS
to
Alice Wertz ♥!!!

whose comment (#6) was selected by the random number generator at random.org to win the lovely "GO!" book:


i have also put together a bunch of maps, foreign language text, game pieces, playing cards, guide book pages, and illustrations with a travel theme from my collection of new and vintage ephemera:


please contact me, alice, with your snail mail address (my email is on my profile page!) so that i can send these goodies to you ASAP!

i hope you will enjoy them!

Monday, July 26, 2010

what i made while i wasn't making anything out of paper

i was away for the weekend... (yes, again; it never rains, but it pours travel-wise in these parts!) ...and thus have no cards or other papercrafty goodness to show you, but i did get to do a bit of crocheting on the road, so of course i made something terribly practical:

the death of yarn* asks,
"EXCUSE ME...WHICH WAY TO THE PURLY GATES?"

yes, that IS a very small and utterly adorable amigurumi grim reaper!** or rather, in this case, due to his oversized eyes and slightly wonkily tilted head, he's more of a wistful reaper, really.

i have to admit, i didn't think i could top the CROBOT for weirdness in yarncraft, but my darling stef gave me the utterly awesome book Creepy Cute Crochet for xmas, and i absolutely LOVE it, so you will definitely be seeing more sweet and funny crocheted monstas in future! ♥♥♥


*to those who don't read terry pratchett, this joke will not make sense. in fact, in all probability, this joke will only amuse missus trash and myself, and i am fine with that! :)

Saturday, July 24, 2010

travel book giveaway!

now that you see how easy the whole travel book process is once you sensibly embrace *CHEATING* the way i do, wouldn't it be great if you had a book of your own to try it out? well, then, how about this one?


yep, i made an extra one, with a decorated cover, days-of-the-week pages, themed pages, and loads of blanks to fill in however you'd like. you only need to add some memories...and maybe a postcard or two!

just leave a comment on this post telling me your favorite vacation...or your dream vacation...by midnight on thursday, july 29th, and i will choose a random winner to get the "GO!" book...and maybe i'll even throw in a few travel-inspired vintage goodies from my stash, too!

Friday, July 23, 2010

yes, you *CAN* actually do this, too!!!

the last couple of days i've showed you how i prepare a travel book before vacation, and what i get done while i'm away. by working for 15-20 minutes each night of my trip, i've done the bulk of the work, so all i need to do
to FINISH the book at home is:

1. decorate the cover
ok, yeah, tihis could be done BEFORE the trip, and arguably it would even increase the feeling of having a "real" dedicated, specifically-for-this-trip book; but i often like to use something from the trip to form the base of my cover: a local newspaper or subway map or shopping bag, so i prefer to wait and do the cover when i return.


2. add photos
they can be ordinary 4x6's, larger panoramic sized pages (either single photos or colllages), or wallet sized prints you add to your text pages. the great thing about the single ring binding is that you can add them now if you're printing at home, or wait until later if you're getting professional prints. (or sharing with friends!)


3. finish journaling & adding decorative elements
again, the total flexibility of a single book-ring style means that you can add, subtract, or move things around for as long as you want. since i tend to travel with only the most basic supplies, this is where i get creative, adding transparencies, decorative papers, tabs, rub-ons, and so forth. i like a bit of dymo-labeling to journal on the brochures and postcards i've collected on my trip, as well. sometimes i'll have taken the label maker on the trip, but if not, this is when i add that detail.


4. get another perspective
lovely husband jeff DOES NOT journal...but sometimes, if i'm a bit clever, i can get him to contribute to the travel-book process. he already loves helping me collect the stuff, but i like to have his OPINIONS, too! "what was your favorite thing we did on vacation?" i'ill ask him, with my pen & paper at the ready; or, "what was your least favorite thing?" if we're flying home, this is a great time to ask that sort of thing, it's also a good time for us both to make a "top ten" list that goes into the book. even the smallest children will probably be able to tell you a few things they remember most or enjoyed the best, bigger kids might like to make and decorate a top ten list page, or help you choose which photos to include.


seriously THAT is IT!!!

ok, it's not a *traditional* scrapbook with conventional layouts, but if that was my thing, i would still argue that having THIS completed book with all my stuff AND my fresh-from-the-road memories in it would be the ultimate resource for creating those later, at my leisure. until such time as that urge strikes me, i am pretty happy with my little books!!! :)

Thursday, July 22, 2010

travel book part 2: on vacation

ok, so yesterday we made a basic 4.5 x 9" travel scrapbook, the perfect size and shape for collecting all those great travel brochures, menus, photos, and postcards we all love to accumulate on vacation. today i'll tell you the secret strategies i've used to go from travel-journal good intentions, to completed books i absolutely treasure!

1. journal in list form or short declarative sentences
this is the part that would always get me: i couldn't journal during the trip because i was too busy having fun, i couldn't journal when i got home, because there was too much "wrap-up" to do, and by the time i got around to writing things down months later, the details were lost, and once again i'd give up and just put my photos in an album and my souvenirs in a shoebox! now i plan in advance to just capture the facts. typically, my "days of the week" pages read a bit like this: "woke up early, walked on the beach, drove to the botanical gardens, took the "flora & fauna" tour, met the gang for lunch at the bbq place the tourguide recommended..." and so on. if i hear the perfect quote, or suddenly know EXACTLY the right way to tell the funny story of what my two year old niece said to the waitress at denny's, yes OF COURSE i write it down in more detail; but by going into this project with the idea i won't really be "writing"-- just making a list of everything i did-- REALLY frees me up to get these FINISHED! but the most important, and vital aspect is to...


2. write down the day's events before you go to bed
ok, yeah, this part sounds daunting. but i PROMISE it's only going to take 10 to 15 minutes, and it is the crucial factor in really remembering what you did which day and with whom. by doing this you will capture all the facts from which more detailed journaling can be done later. (or not!) plus, this is the only thing you need to accomplish each night, except that it will do your morale a world of good if you also...


3. add your souvenirs to the book each night
i punch a hole in postcards and brochures (amy tangerine has a GREAT tip for tri-folds!) so that they become their own pages; i like to staple ticket stubs right to their accompanying brochure, and if a museum or theme park has given us a badge or sticker for admission, i'll peel it off my jacket at the end of the day and stick it on there too! restaurants often have takeaway menus with the same selections offered on site, this is a great way to remember what everyone had to eat and whether it was a tasty treat or an expensive disappointment. i collect business cards from anywhere we shop, and write what we've bought on the back. putting the stuff in its home right away serves two purposes: for one thing, the fact that your book is ALREADY COMING TOGETHER on day two is a giiiiiiiiiiiiiant morale booster (& totally converts fellow travellers into helping you collect "the stuff") also, it eliminates the intimidating factor of having sort through a giant pile when you get home, deciding what to use and what not to use, and how to construct the "perfect" scrapbook page. if...and only if... you have extra time and energy on a few evenings you can also...


4. (optionally) write separate pages or postcards about specific attractions
when i am preparing my pages before the trip, i like to make one for each place we think we're going to go. sometimes, our plans change when we get there, and they turn out to be superfluous, but since they're only made of plain old index stock from staples, i don't mind wasting them, because the coolness of having an "official" page on which to write about longwood gardens, or the metropolitan museum of art on the same day you've been there, is hard
to beat! if i don't have time to do this "on the road" it is not hard to use my "days of the week" pages to complete them at home. if anything particularly interesting or funny happens which i don't have time to write about, i make a note on a postie, just to remind myself that i wanted to include it.


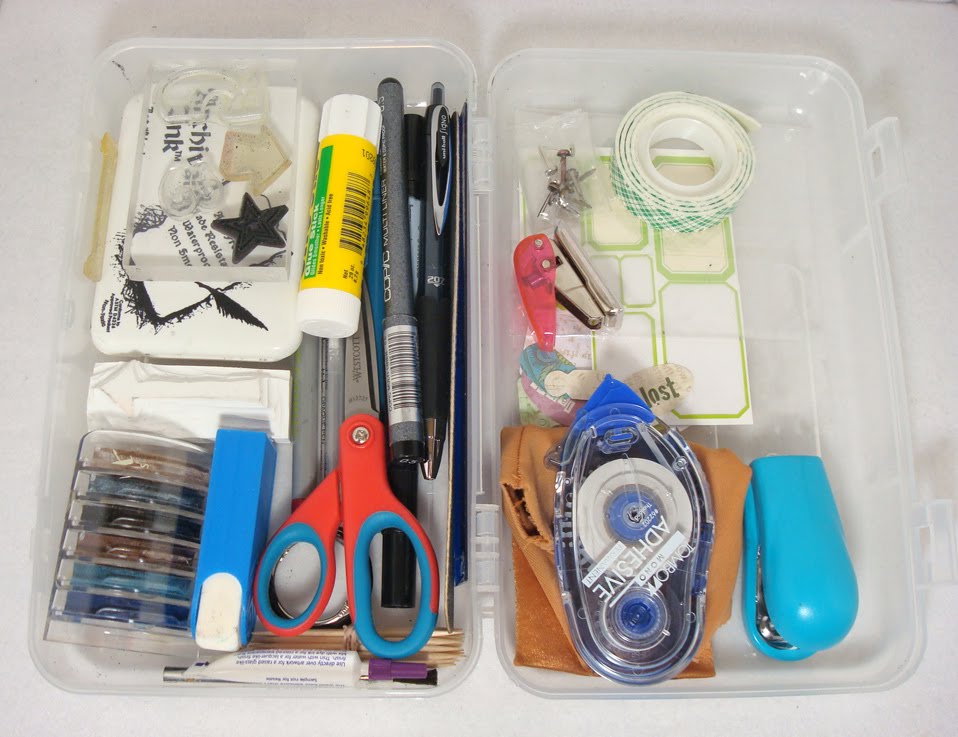
THAT, my friends, is truly ALL that you need to do during the trip--and this is what you bring home at the end of vacation!
it really isn't MUCH, is it? take the book with you, make a list each night, punch some holes, write postcards, jot down ideas. your book will be taking shape before your eyes, and each bit you do makes you want to do more! plus, you've now made the "finishing process" (which i'll describe tomorrow) a piece of cake that you WILL actually be able to complete!

Wednesday, July 21, 2010

anatomy of a travel book


if you're anything like me, you take a gazzillion photos on vacation, and LOVE to collect all those cool little pieces of paper even the shortest journeys produce: brochures, postcards, receipts, badges, menus, etc., with the firm intention of coming home and assembling everything into a fun travel book by which to remember your trip. and if you're anything like me, the process tends to stall a bit after the "coming home" part...when all those awesome tickets and tokens get placed reverntly in a box and are sadly left to languish as the more pressing demands of "real life" assert themelves.

or i should say, you are like i used to be a couple of years ago, before i discovered the infallible secret to finishing travel books, which is, of course TO CHEAT! :) ok, yeah, there is a teeny bit of planning involved but it's minimal and takes place BEFORE the trip when you're excited about both the vacation and the prospect of documenting it. if you do these couple of things before you leave, i can virtually guarantee that you will come home with a travel book that is practically done...oh yeah and did i mention it'll be practically *FREE* too??!

interested? ok, well try this:

1. make "the bones" of the book and take it with you
yes, you can buy a travel scrapbook, but it's so easy (& so cheap!) to make one tailored exactly to your needs and made especially for this trip! (which totally helps with the FINISHING part!) all you need is some chipboard (or cardboard) for front and back covers, a selection of cardstock pages, and a ring to hold them all togther. if you only do one thing from this entire post, making a specific, dedicated book, is the one to do! if you take a notebook or journaling cards, yes, you might write on them, but the impetus of having a "real" book on which you've already spent a bit of time, provides an UNBEATABLE psychological advantage!!! especially if you...


2. make your book a size and shape that is perfectly suited to the task
this is the biggest difference between my homemade books and store-bought travel scrapbooks. i make mine specifically to accommodate the standard travel brochure which is approximately 4 x 9"; this way i never worry about how to display my collected ephemera on "layouts"...pretty much each item i collect gets to be its own page! i punch a hole in it, and maybe write a note or two, and then let them stand on their own. apart from that, it's a good idea to...

3. give your book a structure that makes the journaling effortless
because let's face it, this is where most of us get intimidated, isn't it? we aren't professional writers, we're not going to be able to sum up the mona lisa or the statue of liberty or the beach at sunset with three perfect sentences no one's thought of yet. luckily, we are not attempting to win a pulitzer, we just want to REMEMBER the stuff we did on vacation. and to do that, we're gonna fill our book with pre-made pages, labeled with the days of the week we'll be away. believe me, having a page that says "saturday" in your OFFICIAL travel book for the trip, and knowing that it is the ONLY thing you have to complete on saturday, gives you a big edge in actually GETTING IT DONE! which is why the best plan is to...

4. use a page template to save time and energy
i make mine using broderbund's printshop (but microsoft word or any other word processing or graphics program will work) and i can fit two 4.25 x 8.5" travel book pages on one 8.5 x 11" sheet. i usually print on plain old staples-brand white index stock. the page design is never fancy--i know i am going to cover it with writing and/or photos anyway! i like to use one font throughout for consistency, and i don't feel the need for lines because i write pretty neatly...but these details are based on my personal taste. the main point is to save time and energy by designing *ONE* basic page and letting it work for the whole book.

5. be specific so you'll follow through
i like to make a labeled page for each day of the week, and one for each destination or attraction i think we'll be visiting on our trip. sometimes i also work thematically and make pages for things like food, accomodations, shopping, weather, fellow travelers, and so forth; plus i like to include some blanks, just in case i need more room for a particular story. do i use every single page i print? nope. but i love having lots of choices, and they're so inexpensive to make that i don't mind if a few get tossed at the end. (i always save the file when i am done, so that if i come home needing a few extra pages, it is super-easy to make more!)

ps: the examples shown are of the template for my washington trip, i have all the days of the week in pdf form--email me if you'd like those!


6. pack minimal, basic supplies
i realize it sounds counter-intuitive, but in my experience, the more i pack the less i use! this project isn't really scrapbooking, as such, i'm just recording my activities, and saving ephemera; that's all i'm going to have time to do; the fancy bits (if any!) will get done after i'm home, so i don't need much stuff. i need a few pens, including one that writes on glossy paper; i need a hole punch (staples has cool miniature ones that really WORK!) and a stapler (again, i like a small one...but it has to take REGULAR staples!); scissors, a couple of adhesives, maybe a few basic stamps and an inkpad, some label stickers, a couple of brads for attaching bulky items, and that's about it. i pack everything in a plastic schoolbox, protect my book by putting it in a large ziplock bag, and i am ready to go!!!


tomorrow i will tell you my strategies for working on the book *DURING* the trip...it only takes 15 to 20 minutes per night, and it is THE KEY to really finishing the book!!! ♥

Monday, July 19, 2010

heart the art: week 28 (drama)

for last week's HEART the ART prompt gina chose DRAMA. i think, at some point in our lives, we've probably all been "supporting actors" in someone else's drama, haven't we? the thing is, once you get sucked in--however unwillingly--it can be really hard to get back out again! one of my resolutions for this year was to JUST REFUSE to participate any more...but without *that* becoming a scene in itself. believe it or not, it's actually going pretty well, and boy is that ever a restful feeling, to know that when you see it coming, you have a choice whether or not to participate. and i choose *NOT* thank you very much, because:

(digital curtain element: "my drama queen" kit by vinnie pearce, pixel canvas; scarlett o'hara picture cut from a magazine; cardstock stickers & diecuts: sassafras, k&co; rub-on letters: american crafts; glitter letter stickers: making memories; adhesives: uhu gluestick, 3m foam tape & doublestick tape; other: sewing machine)

Saturday, July 17, 2010

heart the art: week 27 (perhaps)

finally, after an almost entirely paperless week, i have made something--HOORAY! it's for HEART the ART prompt #27, and it's been in my head for two weeks, just waiting to get out!


(vintage: timecard, sewing pattern, book paper; patterned paper: scenic route; birdcage brush (printed on inkjet transparency): scrap-n-fonts; glimmer screen stencil & glimmer mist: tattered angels; rub-ons: heidi swapp & fancy pants; chipboard letters: american crafts; ink: ranger; other: sewing machine, manual typewriter; adhesives: uhu gluestick, 3m foam tape, tombow monorunner)


i like the randomness of this one; i just grabbed things and played with them and stuck them down pretty haphazardly: the base (& journaling block) is a vintage timecard, the birdcage was one i added to a half-full ink jet transparency i was printing out, (they are too expensive not to fill completely!) the leaves are from the last sheet paper i have in that pattern, (i will *miss* scenic route!!!) and of course i needed to use both my typewriter AND my sewing machine after nearly a week without them!

i ♥LOVE♥ going away, but it's niiiiiiice to be home!!! :)

Friday, July 16, 2010

who knew?


apparently, for security purposes, national park employees take some of the smaller monuments in at night, and put them back in the morning before the tourists arrive! :)


(i am quite proud of this photo: it's not an ACCIDENTALLY funny picture, for once, i actually saw the comedic possibility on site and lined my shot up accordingly!)

Thursday, July 15, 2010

i'm pretty sure this is true, actually!


hello!
i am home,
having had a wonderful time with friends
in washington, dc!

(will get back into the online swing of things asap!)
♥♥♥♥♥

Sunday, July 11, 2010

road trip!!!*


i apologize for being a bad blogger and an even worse commenter, but for some reason the preparations for a trip always seem to take me roughly three times as long as i am going to be away. what's up with that? and is it just me or does anyone else feel that way, too??!?!

i'll be back on thursday or friday and in the meantime ought to have reliable access to email, but probably not much time online.

have a fabulous week, darlings!
(& if you are on the east coast of america, do try

to keep cooooooooool!!!)
~♥♥♥~

*i am not actually going to vegas. or at least, i am not planning to go to vegas, but you never know, right??! ;)

Wednesday, July 7, 2010

boldly pushing back the frontiers of "last minute"

yes, i have been known to cut it close when it comes to deadlines, but this is pretty impressive even for me: this week's sketchy thursday challenge ends in 30 minutes. so let's get right to it then!

here's the sketch:


what's the first thing you notice? yep--it's a two-pager. when diana posted one of these babies in may she jokingly asked how i would make a *CARD* based on a two-page sketch, and i immediately said, "tri-fold!" unfortunately, i didn't get a chance to make a card for that sketch, but this time i was determined!!!

so here's the left-hand "page":

and here's the right-hand "page":


i didn't have a sketch for the very inside, but having gone this far (& inspired by linda...whose tri-folds are AWESOME!) i went the rest of the way:

and there you have it without a moment to spare, but hopefully worth the wait! :)

♥♥♥♥♥♥♥♥♥♥

(materials: patterned paper: fancy pants, making memories, sei basic grey, daisy d's, creative imaginations; cardstock diecuts: k&co, fancy pants; label dies: nestabilities; stickers: creative imaginations; florals & gem decorations: prima; bling frame: heidi swapp; bling word: mambi; chipboard flowers and leaves: basic grey; stick pins: making memories; rub-ons: american crafts, basic grey, making memories; epoxies: recollections, ki, love elsie; brads: studio g; ticket strips: rhonna farrer, house of 3; ink: colorbox; adhesives: uhu gluestick, tombow monorunner, 3m foam tape & doublestick tape)

Tuesday, July 6, 2010

lauren makes the *WEIRDEST* things sometimes!

the proof being that even lauren thinks so!!! :)

this is one of the very strangest things i have ever made, so of course it has a very special place in my heart! but first, the inspiration: a couple of years ago my friend barbara and i were in this fabulous art gallery/gift shop called coast highway traders in encinitas, california, where they happened to have a huge selection of frida kahlo-inspired items, including these really amazing little portable shrines that came in tiny wooden boxes. we both fell in love with them, and even while i was there my crafty mind was thinking, "i wonder if i could MAKE something like that??!" of course at the time i didn't think to TAKE a picture, and i cannot find a photo online anywhere; but that's just as well because my version is NOTHING like it anyway, and probably would not benefit from being placed NEXT TO the ones we saw!!!

this year, as part of barb's birthday present, i have finally made an attempt at a tiny, portable, frida "shrine", and here it is now:

the container is a mint tin, obviously; i felt like this theme had enough challenges without my having to CONSTRUCT a box! :) inside is a giftcard holder (the real birthday present) little booklet i made.

i was planning just to make a little iconic triptych to go inside, but i had so much fun making my art-o-mat booklet for the swap with gina, and also....there are SO MANY great frida self-portraits it was hard to narrow down! finally i settled on six, which i paired with a quote from frida on why she painted so many:

text (which i printed on a clear inkjet label) reads, "i paint self-portraits because i am so often alone and because i am the person i know best." -frida kahlo

knowing full well that the natural inclination of double-sided inky booklets is to try really hard to FALL APART IMMEDIATELY, i used a piece of patterned paper for the side with the portraits, and got inky and creative on a separate piece of paper which i later xyroned onto the back for maximum strength and durability. (who says you cannot teach an old dog new tricks, eh?!)
as you know, with a bit of tutelage from marisol (and tim holtz!) lately i have been ♥LOVING♥ to make multi-layered (but FLAT!) backgrounds using masks, spray ink & ink pads, stamps and distressing. i think this is the best one i have made so far, and i am quite obnoxiously proud of it!!! :)

♥♥♥♥♥

and now, here are some links to cool frida stuff i either used as inspiration, or stumbled on whilst making the project (i printed this list inside the g/c holder, in case the birthday girl wants to spend it on a frida-themed item):

The Diary of Frida Kahlo by Frida Kahlo (part art journal, part sketchbook, totally fascinating!)
Frida Kahlo: Pain & Passion by Andrea Ketterman
Frida Kahlo, the Artist in the Blue House by Magdalena Holzhey (from a series of books for kids called "Adventures in Art" which they have at our library)
The Lacuna by Barbara Kingsolver (Frida & Diego are supporting characters in this rather wonderful novel)
Frida directed by Julie Taymor (a must-see for anyone who likes art-themed films!)
Frida Kahlo Magnetic Personality Finger Puppet by the Philosopher's Guild (there are loads of other famous people, too!)
Frida Kahlo Art Tattoos by Dover Publishing
Frida Portrait Greeting Card with stickers from Museumize (this is an AWESOME site that the amazin' stef sent me!)

♥♥♥♥♥♥♥♥♥♥

(~materials~ patterned paper: basic grey; rubber stamps: tim holtz, cherry arte, stampin' up, purple onion, love to stamp, autumn leaves; masks: heidi swapp; spray inks: glimmer mist, radiant rain, + custom colors made from ranger distress re-inkers & perfect pearls (thanks, mari!!!); markers: tombow; stamping inks: colorbox, ranger, stewart superior; flowers: prima, making memories; rub-ons: making memories; heart sticker: ek success; heart bling & ribbon: michaels; font: mom's typewriter; other: mint tin; frida paintings resized & copied onto kodak photo paper; avery clear full-sheet inkjet labels; dymo labels; sewing machine)
♥♥♥♥♥
eta tuesday morning: believe it or not i had no idea that today (july 6) was frida kahlo's birthday; it's a complete coincidence that i posted this project today; the first i knew was when i opened google this morning and there was a picture of frida on the main page! ♥♥♥

Monday, July 5, 2010

sense of humor...NJ DOT has one!!!

this is a photo of the road (a moderately well-travelled state highway) about 50 yards from my house. i *SWEAR* i am not makin' this up:

the road maintenance guys were out here a couple of weeks ago, patching cracks with tar. (you can see the squiggly bits on the side.) i am not sure whose idea it was to add a little decoration at the same time, but i would TOTALLY hire that individual, because i think they must be fun to work with! (this is the ONLY non-utilitarian bit of tar in the entire 5 mile stretch that was patched; i feel weirdly honored that it is practically in front of my house!) ♥

here's a photo with a little more perspective:

now every time i get in my car to drive southwards, the road *LITERALLY* smiles upon me...and of course i cannot help but smile back!!! :)

Saturday, July 3, 2010

twinchies make a comeback!

i love inchies, but as a gal who tends to work *BIG*...they're just a little bit small for me! :) so i was pretty psyched to discover twinchies (decorated squares which are 2" instead of 1") and i had the feeling that they'd have loads of uses in card-making. this week's 2S4Y sketch (laura's 55) is a nice example of that, i think:


i fit four twinchies in the center of my 5.5" square card, and still had a comfortable margin of white space (in this case, it's kraft-colored white space!) left around the edges:

(patterned paper: creative imaginations, making memories, basic grey, prima, bo bunny, scenic route + vintage french text & vintage ledger paper; cardstock: hobby lobby; rub-ons: fancy pants, 7 gypsies, basic grey, american crafts, tulip; rubberstamp: inkadinkadoo; brad: studio g; cardstock diecut: k&co; border punch: fiskars; inks: ranger, bazzill, colorbox; adhesives: uhu gluestick, tombow monorunner, 3m foam tape; other: sewing machine)

as you can see i'm in a similar vibe to my bird card from earlier this week. in fact, this was the very next thing i made, and i used many of the leftover bits of paper and rub-ons i'd gotten out for that one: ♥HOORAY♥ for more art and less cleaning up! :)

Friday, July 2, 2010

another new (to me) challenge site

the other day, while aimlessly web-surfing (something i don't do enough!) i found a cool site called sunday postcard art. they set a new theme every week (on sunday, obviously) and you can use any medium or style in your interpretation, the only requirement is that your finished piece of art be 4x6"...the size of a standard (continental) postcard. cool, no?! as a postcard collector AND papercrafter, i was intrigued just by the concept, even before i knew that this week's theme is INDIA!!! :)


(elephant illustration from a vintage children's book; text from a hindi newspaper; glossy cardstock images from an old anahata katkin clip art book; bo bunny patterned paper; lil davis vinyl letter stickers; making memories flowers; k&co jewelled brad; core-dinations cardstock; adhesives: uhu gluestick, tombow monorunner, 3m foam tape)

there's a mix of old and new here... (which is quite like INDIA, come to think of it!) ...and i am pretty pleased with the results! plus i cannot help thinking that my HEART the ART journal pages will benefit by my working more often in the 4x6 format! ♥